
Lately I've noticed tons of questions popping up in the forums about rendering in Vegas. I'm guessing most of you are new to Vegas, so I will be going fairly in-depth in this blog.
We will be rendering using the Sony AVC codec. While this codec is idea for uploading to Vimeo and Youtube, NS will not accept it. In a later blog I will cover uploading to NS.
Rendering is one of the most important steps in your editing process. Choosing the wrong settings can turn your beautiful HD footage into the equivalent of something shot on a cell phone. Waiting on a video to render for several hours only to see the final product looks like shit is downright depressing. In this article I'll show you how to get the best image quality into the smallest file size and give some tips to help prevent your hair from falling out.
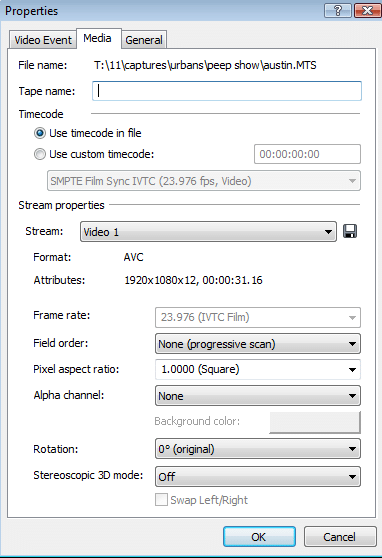
The first thing you should do when preparing to render your video is find out the properties of your raw footage.
1. right click any clip in your project and click on properties.
2. click on the media tab
3. take note of the following items: Attributes(resolution), Frame Rate, Pixel Aspect Ratio.
***IMPORTAINT***
If your using footage with multiple framerates you'll need to undersample all the higher clips to the value of your lowest framerate. To do click on the 'Video Event Tab' under properties. Where it says 'Undersample rate' change the value to match the other clips framerate. (I'll cover more on why in a later blog)
60(59.940)->30(29.970) = .5
60->24(23.976) = .4
30->24 = .8
If you haven't already done so make sure your project properties match your video files.
Click the 'Match Media Button' and select a clip from your project.
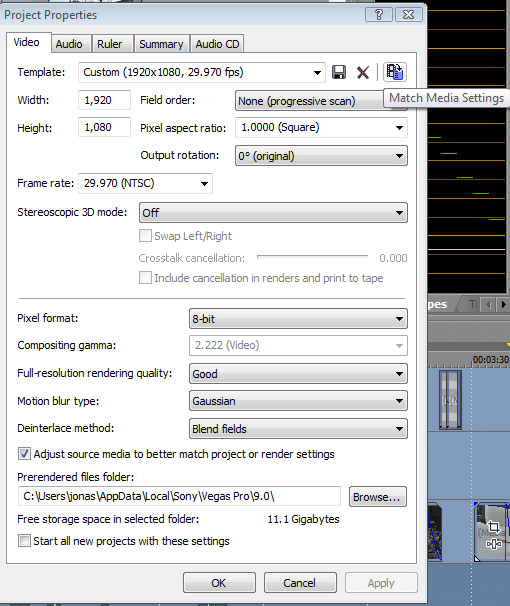
If you have files with different resolutions Vegas will automatically conform them as long as the pixel aspects match, but you'll want to select the one with lower resolution when the time comes to render.
Now that we know our setting we are ready to render our footage. I've been using Vegas for 5 years now and the setting I will show you are, in my experience, the fastest, most compatible, and produce the best quality.
Click File-> Render as...
Save as Type: Sony AVC
Click Custom:
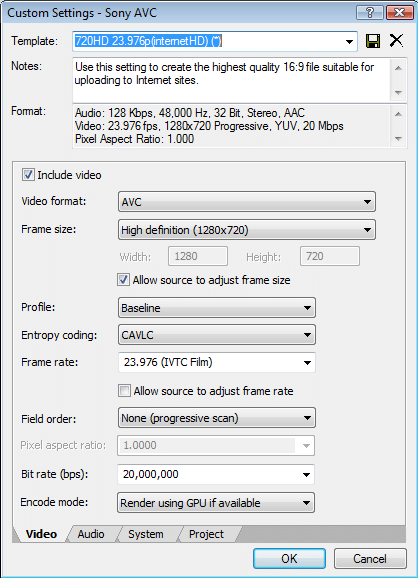
1. Video Format: AVC
2. Framesize: for putting HD videos online you'll want to select 1280x720(unless your video is a different aspect ratio such as the r4 setting of a goPro which is 960p). If your rendering for a DVD or to get maximum quality select the resolution that matches your footage.
3. Profile: High profile will maximize your quality but take longer to render. Baseline is also more compatible with a larger range of video players. Some players may have issuing playing back a high profile video. From my experience the difference in render times and quality is unnoticeable for web videos so I typically render as baseline.
3. Entropy coding: CABAC vs CAVLC- This determines how your video will be compressed. CABAC allegedly has a better compression rate(meaning smaller videos) but takes more processing to decode(meaning slower systems won't play it smoothly). From my experiences both will produce a file of the same size. I recommend using CAVLC.
4. Framerate- match the framerate to your footage. DO NOT 'allow source to adjust frame rate'.
5. Field Order: Progressive if thats what your clips were shot in. Otherwise choose lower field first.
6. Bit-Rate: This will determine the overall quality of your video. Higher bit rates will result in a larger file. For HD choose anything from 7-20 million(or less if you need to meet a file size constraint).
7. Encode Mode: If your you have a new video card(last 2 years) you can select 'render using GPU' to take advantage of its processor to make your renders faster. This feature is only available in Vegas Pro 10.
8.click on the 'project' tab. Where it says 'video rendering quality' select best.
9. Finally save your preset so you don't have to go back through this again.
There go you kid-o's. Hopefully this post will save you more time than it took me to write. Check back in for more tips on using Vegas.
Comments