It looks like you are using an ad blocker. That's okay. Who doesn't? But without advertising revenue, we can't keep making this site awesome. Click the link below for instructions on disabling adblock.
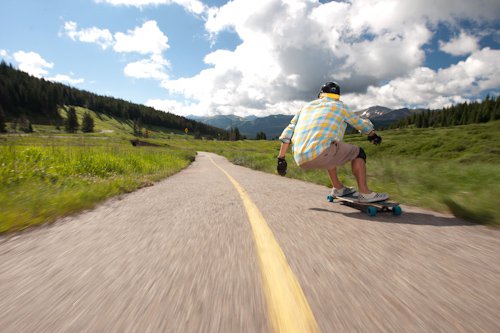
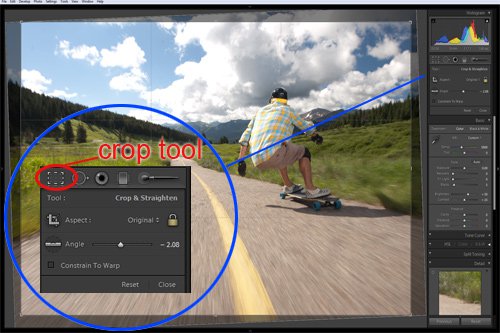
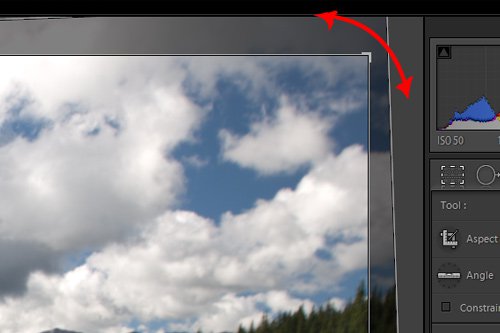
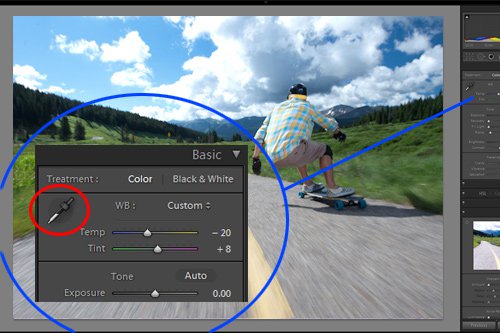
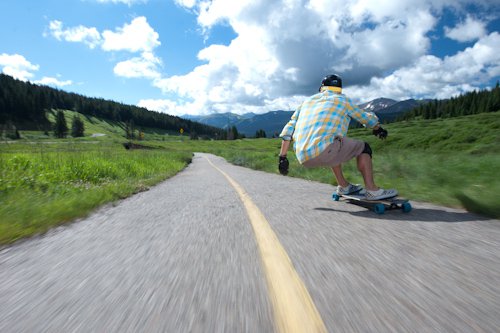
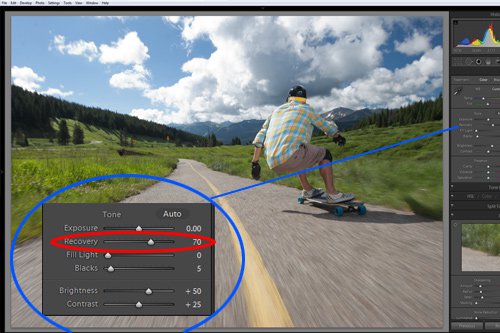
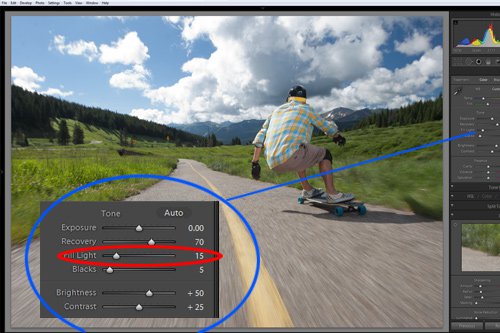
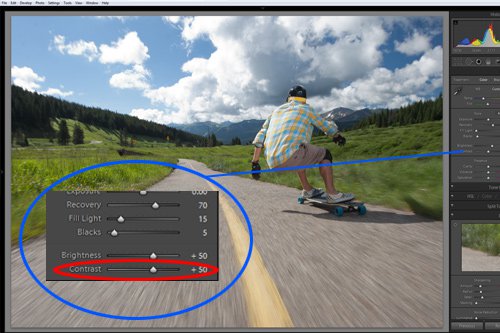
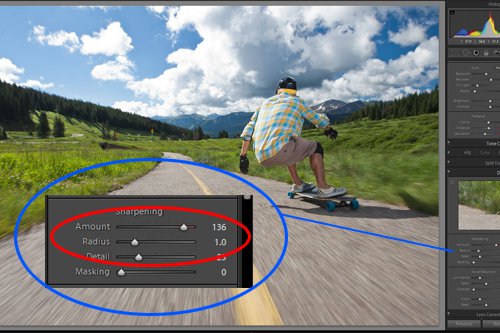
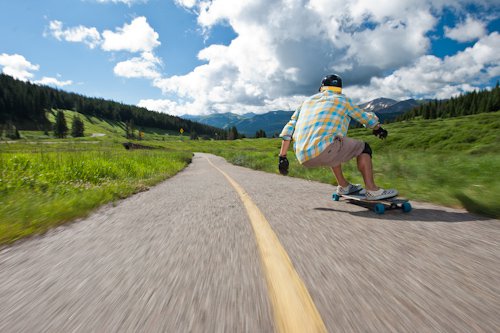
We have already explained how the different basic adjustments work, now we are going to show you how to apply all these adjustments in real life to an actual image.Don't forget that all the different setting will be different for your own images. That's why it is important that you are not following blindly, but instead you are practicing on an image of your own and adapting all the setting, until you get what you like as a final result. Applying the same values as the once we appy for our image mostlikely won't work.Let's begin, for this example we picked a regular photo of Mike Dunworth longboarding down the hill. Looking at the original image, we can tell that it looks a little warm, the clouds are somewhat overexposed and Mikey could be brightened a little. Polarized filter was placed on the lens so we can get slower shutter speed and is also improved the overall contrast of the photo. If the shot was taken without a polarized it would look a little washed out(just like every other RAW file that comes out of the camera). You can easily fix the washed out look by adding some contrast. And finally we see that the shot could be straightend. The first thing we are going to do is make sure that horizon line is somewhat straight. Click on the Crop Tool Icon or hit "R" on your keyboard. Now you are able to grab the corner and rotate the image until it is straight.Next this would be the White Balance, it is always a good idea to have correct WB before you start playing with other setting. Use the white balance selector tool to sample mid gray area. In this case the pavement should be close enough. This actually made the whole image blue, so then manually we grab the Temp slider and move it to the right. This will introduce warmth to the image, and make it look good. Again it is important to use your own judgment istead of following blindly.Now that we have the image straight and we fixed the White Balance we need to make sure that the exposure is good, look at the image and the Histogram. Move the Exposure Slider to the left and then to the right and make sure that the image looks the way you want it..not too bright not too dark. In my case the exposure is pretty good, so we are not going to mess with the exposure slider.The next slider is the Recovery slider and that's the one that is going to help me get more detail in the sky and also darken the road just a bit. Using the recovery slider often requires for you to compensate with some contrast because it make the image look flat.The recovery slider not only darkened the road and the sky, but it also darkened our talent. Use the Fill Light Slider to brighten some of the darker areas of the image. Don't over use this slider because the image starts to look like an HDR photo.Now it is time to add some Contrast. We have to compensate for the Recovery and for the Fill light sliders. If you add too much contrast the sky is going to loose detail and the dark parts of the image will get really dark. Another thing to keep in mind when using the contrast slider is that it adds saturation to the image. So don't overuse it, move it back and forward until you find a good spot and then back it off just a little.You photo should be looking pretty good already. Now we are going to add a little bit of Clearity, look around you image and spot big areas with high contrast, like the clouds. Increase the Clearity until you start seen a halo around them and them back the slider off. This way you can easily find the sweet spot.Next two slider are Vibrance and Saturation. I will leave them to you, since color is a matter of taste.Depending on the ISO setting of you camera, you may have to apply some Noise Reduction and now would be the time. Use the Liminance and Color sliders to get rid of the two different kinds of noise. Noise Reduction in LR3 works extremely well, but still make sure you don't overuse it because you are going to loose detail. Think of noise reduction as the opposite of sharpening.And now that we have done all the other adjustments and we are ready to export the image, there is only one more thing we need to do. Sharpening, we would recommend using low radius(not more than 1) and high Amount. This should give you image a really nice sharp look.In the "Basic Adjustments in Lightroom" article we covered what every slider does. Use the article as a reference, when adjusting your image, this way you are going to know what every slider actually do. Experimentation would be the best way to figure out what you like and what you don't.Underneath you can see the difference between the original image and the one we have adjusted in Lightroom. Related articles:White Balance ExplainedHistogramBasic Adjustments in Lightroom


Comments