It looks like you are using an ad blocker. That's okay. Who doesn't? But without advertising revenue, we can't keep making this site awesome. Click the link below for instructions on disabling adblock.
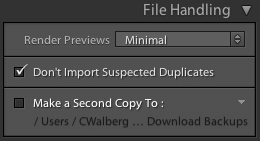
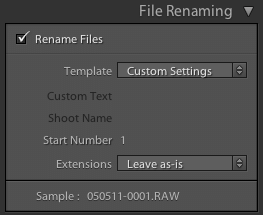
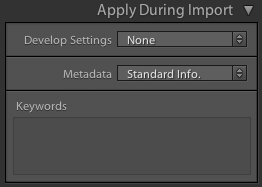
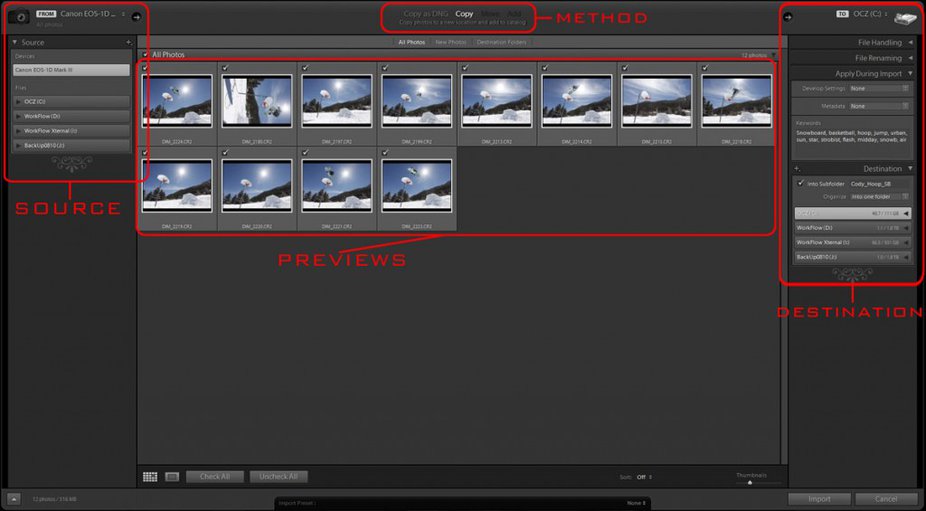
As we mentioned before, Lightroom is our favorite program for organizing images, basic adjustments and sometimes our complete workflow. After doing a photo shoot for a client you may want to send out some samples so the company can choose the images they like. You don't want to send RAW images, lacking contrast, color and sharpness and you don't want to spend 20-30 minutes per image in Photoshop either. It's pointless to spend all that on images that your client may not like, when you could be marketing yourself instead.We are going to show you how to import your images in Lightroom to start your editing process.To begin, make sure you are in the "Library" module and click on the import button located in the bottom left corner. This will open up the import module which is going to let you download the images form your camera to your hard disk. It will automatically open when you connect your camera or card if Lightroom is already open. The module is designed to be worked from left to right. First, select "Source" which should be your camera or memory card reader, then make sure the images you would like to import are selected. There are several options for importing images. You can choose to copy the images as they are, or copy as a DNG. DNG is Adobe's alternative to RAW, it is a TIFF based file that maintains high quality and allows significant use of metadata. Most magazines accept TIFF and DNG files exclusively. There are several options on the right side. First is "File Handling," where you can select to have the files create a duplicate copy of all files in a location. This is great for backing up images which you should ALWAYS do in case a hard drive goes haywire and scratches all that hard work! Under File Rename, you can rename your files (obviously), and the way we recommend is by "Your Initials-Date (DDMMYY)- File Number (0-1000)" which looks something like this "CNW-091211-0012" This is a good way to keep from creating duplicate files on accident and helps you keep track of all files by date. To set this click Template>Edit and insert "custom text" first with your initials. Then click on Date, and choose (DD) and press insert. Now do the same for both (MM)Month and (YY)Year. Next, choose sequence # and insert (#00001) or however large a file number you will need for a day's shooting. Now, click "preset" at the top of the window, and choose "save settings as new preset". Name the preset, and make sure it's always selected under file renaming for each import. All of your files will now be in order and named in a recognizable and explanatory manner.The next window is "apply during import". These are settings that will be added to the images on import and include metadata, keywords, and develop settings. If you already have a certain develop preset you can choose to apply it to the images automatically, but generally we skip that one because most images are too different for it to work well.Below that is the "metadata" option. Here you can create a custom metadata template. Metadata is information about the image that you type in and that is stored within the image after import. It's a good thing to label images here with your name, phone, website, e-mail, and any other information about yourself for before sending images to anyone. This way companies can track who took the photo, and if the image was stolen, you'll have proof! To set this up, click "metadata" and choose "New…" Enter all data including a preset title, and click create. By default lightroom should now automatically select this preset on import, but it's always best to double check!Finally, we have the keywords. This is how you will search and find your images in Lightroom and huge part of what makes the program work so well. Don't be general with these, the keywords should be specific but also something you would think of if you were looking for the images. Sometimes a year is good, location is great, and a specific detail will really let you find the image. Don't skip this one!To complete the import, on the right side, choose the destination folder for you hard disk drive and click the "Import" button. If you did everything correctly, the files should have been copied to your hard drive, with a backup somewhere (if you chose this option) and will all have been renamed, given metadata, and keyworded. Now it's time for the fun to begin! Dive into the program and start with your basic adjustments first, explained here.Click on the image to enlarge it.The import dialog is pretty intuitive so it will take you couple minutes to figure it out. Take yor time and check out the different options you have. You never know when one of them will become part of your daily workflow, and most of them should!


Comments