It looks like you are using an ad blocker. That's okay. Who doesn't? But without advertising revenue, we can't keep making this site awesome. Click the link below for instructions on disabling adblock.
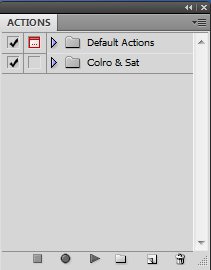
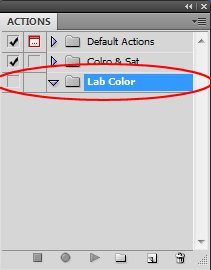
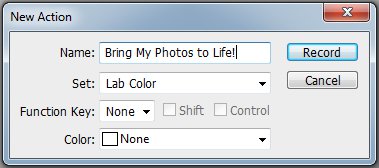
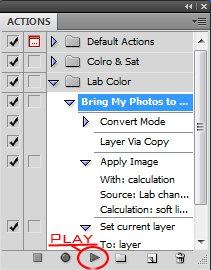
Actions in Photoshop may not be an essential tool that you can't live without, but if you get lazy from time to time, today is your lucky day. We are going to show you how to be lazy and still get stuff done! (A true American Dream!)Think about actions in Photoshop like an old VCR, you can put an empty tape in it and record your favorite show, and then play it over and over again.With actions, Adobe is giving you an option to record everything you do and then "play" the same action on any image you like.Before we begin I have to warn you, many people stay away from actions because they don't trust any automated processes. Actions CANNOT do everything, and won't be able to do your laundry, or wash your car. However, it can apply the same color adjustments, place watermarks, and sharpen or resize as many images as you like. All this will cost you is a single mouse click. To begin go to the top menu and choose "Window" and then "Actions" or press Alt+F9, the Actions dialog will appear on the screen. It will have at least one "Folder," referred to as a "Set" in the actions window. On the bottom of this panel you will find several buttons. The first few look just like the control panel on your old VCR (Stop, Record and Play).There are several default actions that you can use right away, but if you have a specific process you need on each image, you'll probably have to make your own actions. To make your own action you should start by creating a Set with a proper name just so you can keep things organized. In a set you can keep multiple actions, so let's create the first one. Click on the "Create new action" icon and you will see the new action dialogue on the screen. In here you can give you actions a name which is highly recommended especially if you are going to be creating more than one action. For this example we will name the action "Bring My Photos to Life". You can also select a "parent" Set and assign a keyboard shortcut for this specific action. If you get easily confused and you have ton of actions you can assign different color keys for your own convenience. Next, hit the "Record" button and as you can probably figure it out, you are now recording. You are not literally recording mouse moves, just operations (so painting specific areas, unless masked, will not apply. This way, when you move your mouse around or open a different window outside Photoshop nothing will happen, but if you add an adjustment layer for example you will see new line in your actions window because this operation will get recorded. Apply all the necessary conversions, adjustments and corrections, when it's all set, press stop. Now all the operations/adjustments (actions)have been recorded. Now open a new image, click on the "Bring My Photos to Life" action, press play, and watch the magic happen in front of your eyes. Photoshop will apply all the adjustments you have recorded so you have more time to go out at night (or go shooting which is what's more important!). If you forget what a certain action does (shouldn't have stayed out so late last night…), go back to the Actions window and click on the little triangle next to an action for a detailed view of the adjustments it will apply.The cool thing is that actions are transferable not only to different computers, but also between PC and Mac. So if you come up with some cool FX you can save it as an Action and post it on you blog or send it to a friend.Actions are great timesavers and will rapidly speed up your workflow, take advantage of them!


Comments