It looks like you are using an ad blocker. That's okay. Who doesn't? But without advertising revenue, we can't keep making this site awesome. Click the link below for instructions on disabling adblock.
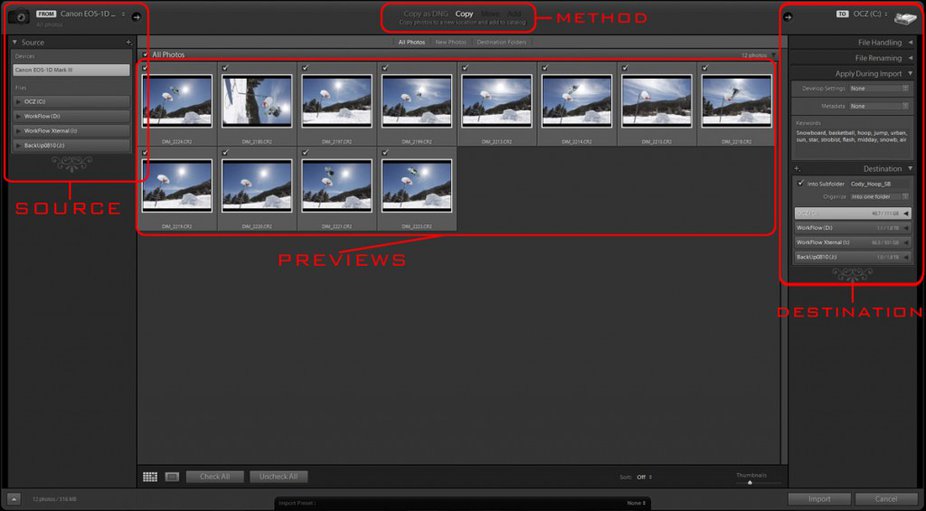
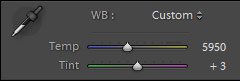
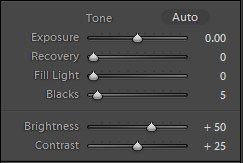
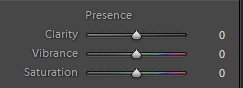
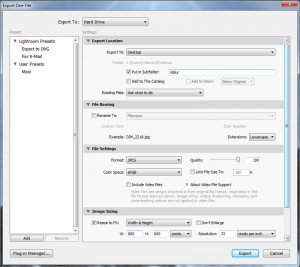
As we mentioned before, Lightroom is our most favorite program for organizing images, basic adjustments and sometimes complete workflow. For example, after doing a photo shoot for a client you may want to send out some samples so the company can choose the images they like. You don't want to send RAW images, lacking contrast, color and sharpness but you don't want to spend 20-30min per image in Photoshop either. And why would you do that for images that your client may not like, when you could be marketing(link to marketing and delete this text) yourself instead.We are going to show you how to import your images in Lightroom, apply basic adjustments and export them in low resolution so they are ready for emailing. To begin make sure you are in the "Library" module and click on the import button located in the bottom left corner. You are going to see the import module which is going to let you import the images form your camera to your hard disk. From left to right select "Source" which should be your camera or memory card reader, then make sure the images you like to import are selected and on the right side choose the destination aka you hard disk drive. You can also move, copy and in the same time convert to .DNG, just copy or just add images to a collection. If you are downloading images form your camera you will have to copy or copy as DNG. DNG is Adobe's alternative to RAW, it is TIFF based file that maintains high quality and mandates significant use of metadata. A lot of the magazines accept TIFF and DNG files. Click on the image to enlarge it.Now that we have all the images imported, you can use the rating system in Adobe LR to set number of stars from 1 to 5 or color rating RED, YELLOW, GREEN or PURPLE. You can do that by using the numbers from 1 to 5 for star rating and 6 to 0 for the different colors. If you like to keep it simple use "p" to pick a flag and "u" to remove flag from an image.Let's move on, make yourself present in the "Develop" module. If you are not familiar with the different modules you can check out our "Adobe LIGHTROOM Introduction" article. All the tabs with different adjustments are on the right side. The first tab is the Histogram that is graphic representation of the image and it a good thing to understand. By default the "Basic" tab is expanded so you can start using it right away, it is the only tab that we are going to cover today, and it is important for you to understand it. Although it is called basic, it contains all the most important adjustments like: White Balance sliders, Exposure, Recovery, Fill light, Blacks, Brightness, Contrast also mid-tones contrast(Clarity) and couple color sliders Vibrance and Saturation.To set the correct White Balance, use the eyedropper(white balance selector tool) and sample neutral light gray area of the image. Lightroom applies the white balance setting and moves the Temp and Tint sliders accordingly. If you are not satisfied with the results you can always fine tune it.People often thread Exposure and Brightness as they are the same, but they are not! Exposure is based on mid highlights and Brightness is base on middle tones.Recovery is the tool you use if you have washed or blown highlights. If you overexposed the image by accident the dynamic range of the scene was too big for your camera and some of the highlights have no detail you can recover up to 2 stops with this tool.The Fill light slider brightens the mid-shadows without touching the highlights. It doesn't affect the darkest shadows either. It is easy to over-use it and get addled shadows, so be careful with it.Blacks slider is the opposite of the fill light slider and it makes the shadows darker. It tends to add contrast to your image. If you hold the "Alt/Option" key while moving the slider, you are going to see only the deepest blacks on your screen. Hold the Alt/option key and move the slider to the right until you start seeing some black pixels.Then we have the Clerity slider, which adds local contrast to the image. I finds larger edges and adds contrast to them. That usually translates in to sharpening, but again it is easy to get carried away and over use this tool.Vibrance slider increases color saturation in the under-saturated and over-saturated tones but it doesn't affect the mid-tones. It works well with action sports because you can make the under-saturated tones a bit more saturated and that will give your images a little pop.Saturation slider increases saturation of all the tones. So you can go from black and white image all the way to extremely colorful image. We would advise you to spend some time playing with all these slider and figure out what every one of them does to your photos. As they are fundamental part of Lightroom are not unique for it, and they are pretty much the same in every image processing software.Now that you have your image adjusted it is time for you to export it. There are couple ways to do that. You can go back to the Library module, and right next to the Import button in the bottom left corner you are going to find the Export button. Or you can go to "File" and choose "Export". Make sure you have selected the file you want to export. There are a bunch of different option in the export dialogue and you can create custom presets, use plug-ins for facebook, flickr etc.We are going to cover the most important options, staring with "Export Location" which is the first tab. It is pretty self explanatory, just specify where you want Lightroom to save your files.The second one is "Files Settings" probably one of the most important. Depending on your need you can export the file as TIFF, DNG, PSD, Original or simply JPEG. The rest of the options in this tab are different for the different file formats. When we export for the net, we choose JPEG as file format, in the sRGB color space and quality around 65.Next tab is "Image Size". Exporting images for the net requires for you to size them down, we usually go with 800×600 or smaller. If you are exporting for a client or magazine high-res. images un-check "Resize to fit" so you can maintain maximum resolution for your images.I hope you had a good time learning the basic adjustments tab in Lightroom, stay tuned for more.


Comments