Newschoolers
Newschoolers
Twitter Facebook Fan
   
  1. Home
    • Hot (New!)
    • Latest (New!)
    • Top Rated (New!)
    • Video of the Day
    • Video of the Week
    • Video of the Month
  2. News
    • Features
    • Top Rated (New!)
    • Interviews
    • Events
    • Opinions
    • Industry News
    • Site
    • Product Info
    • Press Releases
  3. Forums
    • Site Discussion
    • Ski Gabber
    • Non-Ski Gabber
    • Media & Arts
    • Regionals
    • Cults
    • Gear Talk
    • Sell/Trade
    • WTB
  4. Pictures
    • Big Mountain
    • Halfpipe
    • Trending
    • Top Rated
    • Latest
    • Jumps
    • Rails
    • Sequences
    • Crash
    • Ski Equipment
  5. Videos
    • Summer
    • Jumps
    • Edits
    • Trending
    • Latest
    • Top Rated
    • Rails
    • Halfpipe
    • Big Mountain
    • Crash
    • Trailers
  6. Community
    • Reviews
    • Events
    • Polls
    • Games
    • Donate!
    • Top Rated Members
    • Cults
  7. NSTV
    • Chug Life
    • 4bi9
    • Traveling Circus
    • Salomon FSTV
    • The Weak
    • Westward
    • Inspired TV
    • COC TV
    • K2 TV
    • 4FRNT TV
  8. Contests
  9. Gear
    • Sell and Trade
    • Gear Talk
    • Reviews
    • Subscribe to Powder
  10. Store
Home News Forums Pictures Videos
Login to NS   |   Lost your password?   |   Register for NS
Lost your password? | Register for NS
Online

members online

Editing Walkthrough - Gui - Media And Arts - Forums

preload preload preload
Score: 0
 
 
<< First < Prev  1  Next > Last >>
<< Back to thread listing
Subject: Editing Walkthrough - Guide for FCP Users
  • 0
gavinrudy$
Karma : 68118
1383 Posts
Insane
icon
Jun 2 2012
7:32:35PM

Alright, here we go. Basically, I'm going to explain my workflow from camera to internet for video editing in order to possibly help anyone who is having trouble in their editing process or wishes to learn an efficient and clean method of editing.


As of now, I have a Canon T3i and I use either my Macbook Pro 13 inch (not the best for editing, but it does suffice) or my desktop iMac to edit in FCP. Additional programs will be mentioned below.


Okay, let me start this off by saying that this is merely my way of going through an edit process with video. Everyone has their own method of encoding, exporting, compressing, etc. and there isn't any one right or wrong way. I have, however, found this to be the most efficient way, for me, to go through the process. I encourage anyone who has tips or other methods to add to this thread to help anyone out.


Without further ado, we shall begin.


1. Transferring and Organizing Your Video - I insert my SD card into the SD drive on the iMac/Macbook and open the DCIM folder inside the SD Card. I create a temporary folder on my desktop that I will use for the pre-editing process with the clips, normally I'll just label the folder whatever's relevant. Inside that folder, I create three subfolders. The first is titled "Slow Motion", the second "For FCP", and the third "Raw" or "From Camera". I'll explain these folders later when I come to them. Then, I'll drag all of the raw video from the DCIM of my SD card into the "Raw"/"From Camera" folder. Once I've made sure I have all of the files, I can delete the videos from my SD card and eject it.


2. Conforming the 60fps Footage to 30fps - This step is somewhat optional. FCP can handle a 60fps editing base, but I normally edit in 30fps, which is why I go through this step. I have read that more people do this than don't. I open GoPro CineForm Studio to conform the footage, which is a free program that you can get here: http://gopro.com/3d-cineform-studio-software-download/. This program is actually intended to stitch the 3D GoPro videos together, but I've found it does an excellent job and conforming the 60fps footage to 30fps. I import all of the footage from my "Raw" folder, double click the first clip in the batch, where it comes up on the viewer. First, I specify the folder I want the clip to export to, so I go to "Save To" under the viewer and locate the folder I had previously made called "Slow Motion" and select it. Thus, when I convert the clips, they will be exported to that folder. Then, I go down to the "Advanced Settings" below the viewer, and change a few things. I make the "Image Size" 720p, The "Frame Rate" 29.97, and the "Quality" High. Most importantly, I remember to select "Remember settings for future clips". Here's a screenshot of these settings in the program:


Click for larger image


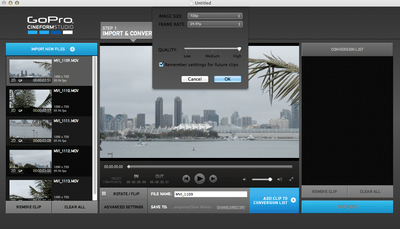
Then, I can click "OK", and the settings are saved. Then, all I have to do is click "Add Clip to Conversion List", and it's added to the column/section on the right side of the program. As I have saved the settings, I don't have to go through this process for all of the clips. Next, I select/highlight all of the other clips from the left column and click "Add Clip to Conversion List" once again. As all clips were selected, all of the clips will be added to the conversion list on the right column of the program. Since the export preferences and location have already been specified, all I have to do now is click "Convert" under the Conversion List. After the conversion is complete, the program will take you to Step 2, Edit, but you do not need to go through any of this step, so once your clips have exported/converted, you can close the program, as the clips are already exported and in the folder on the Desktop.


3. Converting the Clips to an FCP Friendly Codec - This step is pretty important if you're editing in FCP 7, which I'm going to assume a good amount of you are. First, you have to download MPEG Streamclip from here: http://www.squared5.com/. With MPEG Streamclip, you're going to convert the files from the "Slow Motion" folder into Apple ProRes 422 files that are used by FCP. This codec is designed for FCP and will help drastically cut down your render times and expand your ability to change and modify the clips without needing to render. Before importing any clips, open the program to the main screen, locate the "List" tab along the top bar where you'll also find "File", "Edit", etc. In the "List" tab, you'll want to select "Batch List". This basically enables you to create a list of files to export and you don't have to export each individual video one by one. Once you've opened the "Batch List", you can begin to import your files. Start with your first file, you can't select and import all of your files, so here's what you do. Drag the first file of the "Slow Motion" folder into MPEG Streamclip. From here, you can set in and out points on your video using the keys "I" and "O", which can certainly come in handy by cutting the clip down to only what you wish to show as well as decreasing to total video files' size dramatically. Once you've set the in and outs, you can hold CMD+E, or go to "Export to Quicktime". In the "Compression" drop down menu, it will say "Apple Motion JPEG A", but you'll want to go into the menu and scroll toward the top. Find and select and of the Apple ProRes 422 codecs. I use ProRes 422 (LT). Next, turn the quality up to %100. Your menu should look like this:


Click for larger image


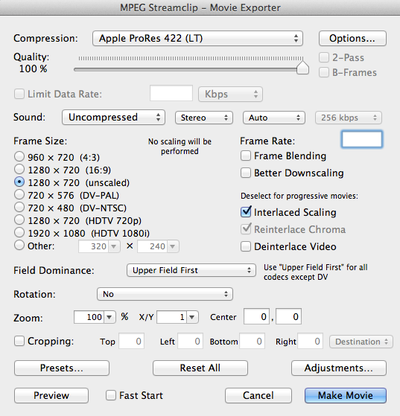
That's all you need to do for the clip, the remainder defaults are fit for the export. So, click "To Batch", which will take you to the next menu, where you choose a destination for the file. Obviously, locate the folder you created in Step 1 called "For FCP" and select it as the destination. (Side Note - You can also rename your clips at this point, which I do, but I'll go more in depth with that in the next step) Again, click "To Batch". This will add the clip to the batch to be converted to a ProRes file. Then, you drag your next clip into MPEG Streamclip. Since the program automatically remembers your clip preferences that you set with the last clip, you simply need to click CMD+E, "To Batch", "To Batch", you don't need to go back in and change the settings. Repeat for all clips until your batch list has become complete. Locate the Batch List window that has a queue of the files. All you need to click is "Go" and MPEG Streamclip will export them to your "For FCP" folder.


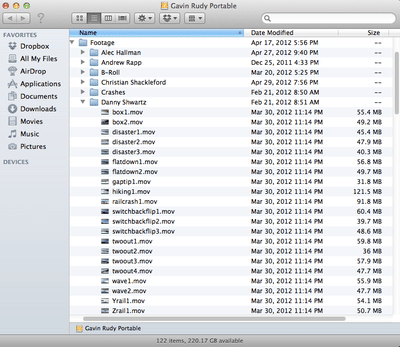
4. Final Preparations and Organization for FCP - At this point, I have my FCP ready files in my "For FCP" folder with appropriate in and out points, too. However, before I get into editing the shots, I always like to organize my music both by the videos' content as well as the athlete.I have an external hard drive where I keep all of my shots. On this hard drive, I have the shots organized under folders for each athlete. Before moving the files to their respective athlete's folder, I rename them in the "For FCP" folder. I'll watch the clip, then title it as so: athlete+trick+tricknumber. So, say I have an athlete, Andrew, and he did a 270 on 270 out on a rail, and it was the 3rd time he'd done the trick on camera. I'd call that clip "andrewtwoontwoout3". I go through each clip and rename according to these rules. Trust me, it will save SO much time and effort to organize your clips, especially if you're compiling something that's a season long and you don't know what's what. By this point, I've got a lot of clips that are titled according to their contents, but we're not finished organizing yet. I go into my hard drive and locate/create a folder labeled "Footage". This is where I'll create folders for all of the athletes and I'll compile all footage from the season in subfolders of this main folder. Obviously, I'll make new folders for any athletes I recently filmed with, and just locate folders of the athletes that I have filmed with previously. Back to the "For FCP" folder, I'll locate any shots of a specific athlete and drag their shots to their folder on the external hard drive. Repeat for all athletes. You can either call it complete here, or you can go into each athlete folder and remove their first name, as the clips are then already classified by athlete. You can batch rename with a program called NameChanger, which you can get here: http://www.mrrsoftware.com/MRRSoftware/NameChanger.html. It's pretty self-explanatory, just use the "Replace First Occurrence With" tool. When I'm done, it'll look somewhat like this for any given athlete:


Click for larger image


5. Edit time! Import all of your clips into FCP and edit away, as for editing tips, that's a whole different ball park, so I'll not concern you with the details. Just remember that you should be editing in a 30fps base at 720p, so when you export, you can just click "Export to Quicktime".


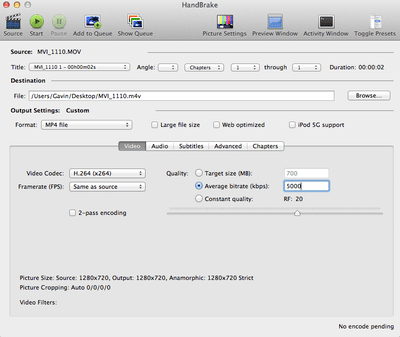
6. Now you've got the final edit, and you're looking to upload it to NS or Vimeo (or the despised Youtube). It's smart to compress the video file so that you both have a smaller file and your settings are optimized for playback on NS or Vimeo. I go by Vimeo's compression guidelines, which I'll review shortly in the compression settings or you can find here: https://vimeo.com/help/compression. For compression, I use a freeware program called HandBrake, which you can get here: http://handbrake.fr/. In the menu, you specify settings for the clip you're going to export. Here's what you should change or check. Make sure that the "Video Codec" is H.264, and below that, you'll find "Framerate", which you should change to "29.97 (NTSC Video)" or "23.976 (NTSC Film)", depending on what you like. I tend to prefer 29.97. Then, more importantly, you'll want to change the "Quality" by selecting "Average Bitrate (kbps)" and making it "5000", which is the suggested bitrate for HD video. So, the window should look like so:


Click for larger image


You're NOT done yet, though! Locate the "Audio" tab to change two things. In the tab, you'll want to change the "Sample Rate" from "Auto" to "44.1", and change the "Bitrate (kbps)" to "320". It'll look like this:


Click for larger image


Essentially, you're done by now, all you have to do is find the "Start" button in the top of the window, where you can execute the compression. When you're done, you'll be left with a much smaller file and a properly compressed video! Now you can just upload this video to any of the video sites that were previously mentioned!


7. Upload and Relax - You're done! Enjoy your hard work!


Thanks guys! I hope this was helpful to anyone who has questions about the editing process! Feel free to ask questions below, modify the steps to your liking, or suggest other methods!

Custom Drawing or Logo Design
http://www.newschoolers.com/ns/forums/readthread/thread_id/680192/

GR Media
www.vimeo.com/gavinrudy
www.facebook.com/gavinrudymedia
www.gavinrudy.tumblr.com

Evolve Chile www.evolvechile.com
  • 0
1337Ultimate Bling!
Karma: 1300639
28241 Posts
@th1337
icon
Jun 2 2012
7:37:58PM
Good guide man! Very handy for those just learning a good workflow.

I've been exporting through compressor a lot at work, which i've found is utterly fantastic. in FCP, you go file -> send to -> compressor, and then you can drag a pre-set to your file, change the destination, and let it run in the background.

If people would like it, I'll make a dslr to vimeo or ns preset for compressor and upload it, you literally drag and drop the setting to your video and it will have the bitrate, size, framerate, etc. all set up for you.
-- Jamie
§ http://surfaceskis.com § http://el33tskier.tumblr.com §
--EASTERN SAMPLE----B.M.I.T.R.--
if i wanna see dudes and chicks doing drugs and each other, while tearing their lives apart from the inside, ill watch antiques roadshow
sammyj
It's the "ON3P is the best" attitude that most ON3P skiers have...
chaitea
☭
  • 0
NJurkiewicz$
Karma: 18808
1532 Posts
Insane
icon
Jun 2 2012
7:57:40PM
Quoting 1337Ultimate Bling! from Jun 2 2012 7:37:58:
Good guide man! Very handy for those just learning a good workflow. I've been exporting through compressor a lot at work, which i've found is utterly fantastic. in FCP, you go file -> send to -> compressor, and then you can drag a pre-set to your file, change the destination, and let it run in the background. If people would like it, I'll make a dslr to vimeo or ns preset for compressor and upload it, you literally drag and drop the setting to your video and it will have the bitrate, size, framerate, etc. all set up for you.
That would be sweet Jamie!
"There is no such thing as a friend on a powder day"

Roaming Productions
http://www.facebook.com/Roaming123

My Vimeo
http://vimeo.com/njrkwcz

Roaming.
  • 0
gavinrudy$
Karma: 68118
1383 Posts
Insane
icon
Jun 2 2012
8:17:43PM
Quoting 1337Ultimate Bling! from Jun 2 2012 7:37:58:
Good guide man! Very handy for those just learning a good workflow. I've been exporting through compressor a lot at work, which i've found is utterly fantastic. in FCP, you go file -> send to -> compressor, and then you can drag a pre-set to your file, change the destination, and let it run in the background. If people would like it, I'll make a dslr to vimeo or ns preset for compressor and upload it, you literally drag and drop the setting to your video and it will have the bitrate, size, framerate, etc. all set up for you.
Fantastic!

I've been meaning to learn compressor, but HandBrake has worked so well for me that I haven't yet. I'd love to learn!

And that'd be awesome if you made a compressor preset!

Also, side note, your big guide on flashes kinda gave me a little inspiration to write this! Thanks!
Custom Drawing or Logo Design
http://www.newschoolers.com/ns/forums/readthread/thread_id/680192/

GR Media
www.vimeo.com/gavinrudy
www.facebook.com/gavinrudymedia
www.gavinrudy.tumblr.com

Evolve Chile www.evolvechile.com
  • 0
Benji.
Karma: 14996
1167 Posts
Insane
icon
Jun 2 2012
9:34:40PM
Nice thread. Helpful for sure.

That preset would be dope.
Flatiron Media

Get Educated
  • 0
gavinrudy$
Karma: 68118
1383 Posts
Insane
icon
Jun 2 2012
9:46:44PM
Shoot. Just realized the last screenshot is wrong. Remember that the Samplerate shouldn't be on "Auto", it should be "44.1"... My bad!
Custom Drawing or Logo Design
http://www.newschoolers.com/ns/forums/readthread/thread_id/680192/

GR Media
www.vimeo.com/gavinrudy
www.facebook.com/gavinrudymedia
www.gavinrudy.tumblr.com

Evolve Chile www.evolvechile.com
  • 0
1337Ultimate Bling!
Karma: 1300639
28241 Posts
@th1337
icon
Jun 2 2012
9:48:09PM
Quoting gavinrudy$ from Jun 2 2012 8:17:43:
Also, side note, your big guide on flashes kinda gave me a little inspiration to write this! Thanks!
Glad it did! We can always use more of this kind of stuff on here, everyone benefits and sharing of knowledge is a great plus of the internet.
-- Jamie
§ http://surfaceskis.com § http://el33tskier.tumblr.com §
--EASTERN SAMPLE----B.M.I.T.R.--
if i wanna see dudes and chicks doing drugs and each other, while tearing their lives apart from the inside, ill watch antiques roadshow
sammyj
It's the "ON3P is the best" attitude that most ON3P skiers have...
chaitea
☭
  • 0
ehvUltimate Bling!
Karma: 881507
42254 Posts
Basement Dweller
icon
Jun 2 2012
9:53:00PM
Another great program to compress with is quicktime pro. I export full quality from FCP then open in quicktime pro and export in a similar way you do through handbrake.
__________________________________________________________________________________________________
Evan Heath Visual
www.evanheathvisual.com
Facebook Page, gimme a like!
http://www.facebook.com/EvanHeathVisual

"she spins left because she has no rights" - Su[G]ar
  • 0
Tgar1024
Karma: 20808
712 Posts
Ridiculous
icon
Jun 2 2012
10:42:41PM
Great thread!!! someone should definitely make one of these for premiere! i just got it and am very confused:)
Like us on FB
http://www.facebook.com/BolderProductions
Check out my videos
https://vimeo.com/user10361105
Check out our blog
http://bolderproductions.blogspot.com/
  • 0
NJurkiewicz$
Karma: 18808
1532 Posts
Insane
icon
Jun 2 2012
11:08:58PM
Quoting Tgar1024 from Jun 2 2012 10:42:41:
Great thread!!! someone should definitely make one of these for premiere! i just got it and am very confused:)
Ya I'm making the switch to premiere and wold love some help with it!
"There is no such thing as a friend on a powder day"

Roaming Productions
http://www.facebook.com/Roaming123

My Vimeo
http://vimeo.com/njrkwcz

Roaming.
  • 0
AwR
Karma: 46761
4812 Posts
No Life
icon
Jun 3 2012
3:43:04PM
threads
gravity rides everything
  • 0
DavidHonda.
Karma: 62444
645 Posts
Ridiculous
icon
Jun 3 2012
9:34:39PM
I use MPEG Streamclip to compress the same way you do in Handbrake, so if you don't want to use two separate programs to compress thats what I do, unless I'm missing something (which I probably am)
  • 0
dunesquirrel
Karma: 16576
432 Posts
Ridiculous
icon
Jun 3 2012
9:55:26PM
excellent guide my friend!
http://vimeo.com/nickdunton
  • 0
Casual.
Karma: 11896
1138 Posts
Insane
icon
Jun 3 2012
10:01:33PM
dat sticky
can i get a leech seed

hollaatchaON3P

i can be found on twitter land @Nuuugz
  • 0
Pandysloo
Karma: 204922
20373 Posts
@th1337
icon
Jun 4 2012
1:08:06AM
Quoting ehvUltimate Bling! from Jun 2 2012 9:53:00:
Another great program to compress with is quicktime pro. I export full quality from FCP then open in quicktime pro and export in a similar way you do through handbrake.
Yup. Faster than compressor, and more efficient as well.
Surface Skis
www.surfaceskis.com
Causwell
www.causwell.com
  • 0
gavinrudy$
Karma: 68118
1383 Posts
Insane
icon
Jun 4 2012
1:37:14AM
Quoting DavidHonda. from Jun 3 2012 9:34:39:
I use MPEG Streamclip to compress the same way you do in Handbrake, so if you don't want to use two separate programs to compress thats what I do, unless I'm missing something (which I probably am)
ah yes, i tried this as well at one point. you can't because you can't compress the audio bitrate to 320kbps for the AAC format... max is in the 200s range. of course, this probably doesn't really matter, i just liked having it all right according to vimeo compression guidelines...
Custom Drawing or Logo Design
http://www.newschoolers.com/ns/forums/readthread/thread_id/680192/

GR Media
www.vimeo.com/gavinrudy
www.facebook.com/gavinrudymedia
www.gavinrudy.tumblr.com

Evolve Chile www.evolvechile.com
  • 0
Boooshank$
Karma: 26947
1672 Posts
Insane
icon
Jun 4 2012
6:05:20AM
Super helpful.

Thanks
WTB: Low light Airbrake lens. Get at me.
  • 0
Shark.$
Karma: 57021
3110 Posts
Addict
icon
Jun 5 2012
1:49:23AM
ay threads! sticky??
________________________________________________________________________________________
Pictures do not erase. We do.
  • 0
Shark.$
Karma: 57021
3110 Posts
Addict
icon
Jun 7 2012
1:07:48AM
Quoting Shark.$ from Jun 5 2012 1:49:23:
sticky
.
________________________________________________________________________________________
Pictures do not erase. We do.
  • 0
chiclesfog
Karma: 674
16 Posts
Newb
icon
Jun 8 2012
4:48:16AM
Awesome! Thanks!
  • 0
B.Taillefer
Karma: 48703
426 Posts
Ridiculous
icon
Jun 17 2012
6:20:28PM
Fantastic guide!

I completely agree that someone should do something like this for Premiere, it would really help a lot of people!
anyone up for some side booters?
  • 0
VT_scratch$
Karma: 352950
7679 Posts
Crazy Fool
icon
Jun 17 2012
6:24:08PM
gotta give this a read through. threads.
sealed4freshness, see whats good - cop a tee!

http://sealed4freshness.com
http://s4fapparel.blogspot.com/
http://www.facebook.com/#!/group.php?gid=154004594636919

MB
All times are EST (-5); The current time is 6:10AM
<< First < Prev  1  Next > Last >>
Reply Thread

Tweet
<< Back to thread listing - Previous Page

Related News Articles

Official Guide Book

Official Guide Book

Jan 20th 2010

Official Guide Book   1962 Seattle World’s Fair Official Guide Book $3.00 Beijing 2008 Olympic Game Official Spectator Guide book $9.99 New Disney Ulitmate Official Guide Book to Club Penguin $18.95 **THE OFFICIAL COMIC BOOK PRICE GUIDE foR Gt. BRITAIN** $3.96 Pokemon Ranger Prima Official Strategy Guide Game Book $24.99 Half-Life 2: Episode 1 Prima Official Game Guide book $19.99 Official Guide to Money Records-Jerry Osborne-Book $9.99 Nhl Official Guide and [...]

  1. Views: 1379
  2. Cmts: 0
  3.  
     
Guide Artbook Oop

Guide Artbook Oop

Apr 22nd 2010

Guide Artbook Oop   ARTBOOK Shin Megami Tensei Perfect Guide Atlus OOP RARE $18.89 ARTBOOK Grandia Xtreme Perfect Guide Book PS2 game OOP $18.89 ARTBOOK Virtua Fighter 2 Perfect Guide SEGASATURN Oop $14.48 FINAL FANTASY X-2 GUIDE & ARTBOOK Easy to Find OOP RARE $12.19 ARTBOOK Arc the Lad II Perfect Capture Guide Book OOP $15.74 Evangelion 2 Artbook THE MASTER GUIDE (PS2 Book) OOP $0.99 Shin Megami Tensei [...]

  1. Views: 1025
  2. Cmts: 0
  3.  
     
Guide Art Book

Guide Art Book

Jan 18th 2010

Guide Art Book   FENTON ART GLASS COLLECTOR’S PRICE GUIDE BOOK $24.95 Book DRAGON FORCE Official Guide Art RARE Import JP $9.00 Vintage book Art Flick’s Master Fly tying Guide 1972 $15.00 Nail Art Design Color Step-by-step Technique Guide Book $1.61 Nail Art Design Color Step-by-step Technique Guide Book $1.61 Nail Art Design Color Step-by-step Technique Guide Book $1.61 BLACK CAT MATATABI CHARACTER GUIDE ART BOOK $14.00 Nail Art Design Color [...]

  1. Views: 763
  2. Cmts: 0
  3.  
     
Adobe Decides to Fix Critical Bugs in CS5 Free After Big Customer Backlash

Adobe Decides to Fix Critical Bugs in CS5 Free After Big Customer Backlash

May 13th 2012

About a week ago Adobe sent CS5 users on a rampage when they not only announced the existence of eight “critical” vulnerabilities split between Photoshop, Illustrator and Flash Professional; but also told users that they would have to upgrade to CS6 if they wanted a fix. Users of CS5 and CS5.5 were understandably outraged, but [...][IMG]http://media.newschoolers.com/uploads/images/17/00/47/15/32/471532.jpeg[/IMG]

  1. Views: 562
  2. Cmts: 0
  3.  
     

Member Of The Month

icon

Vids Being Watched

Pics Recently Viewed

Latest News

GrindMedia MTNAdvisor Surfer Magazine Surfing Magazine Powder Magazine Snowboarder Magazine Skateboarder Magazine Canoe & Kayak Bike Magazine Standup Paddler Fantasy Surfer GrindTV Surf Ski Motocross Mountain Bike
Copyright © 2013 GrindMedia, LLC. All rights reserved.
(Version 4.0.12)
Rendered in 92.5ms
Home | Advertise | Register | Contact | Privacy Policy | Terms Of Use | Logout