It looks like you are using an ad blocker. That's okay. Who doesn't? But without advertising revenue, we can't keep making this site awesome. Click the link below for instructions on disabling adblock.
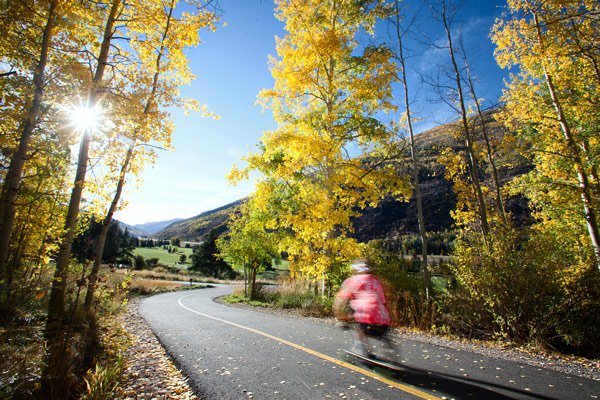
Combine these three techniques, and the results can be spectacular! In this tutorial we are going to dissect the image below and show you how to incorporate these three techniques to create a great action image.Longboard skateboarding is a great sport that's as easy to photograph as you may think, it conveniently always takes place on accessible pavement! But often times when you shoot it, the athlete appears to just be standing on the board with very little excitement going on. That's why it's our job as photographers to figure out different ways to convey motion and create eye-catching action images. The first technique for this image is motion blur. The easiest way to achieve motion blur is by shooting during the late hours of the day with a fast moving subject. But what if it is midday and your subject is pretty slow? Lower the ISO all the way to 100 or even 50, set your aperture to f/16 or more and you may be able to get a slow enough shutter speed, but likely will not be enough to get that SLOOOWWW shutter. The athlete will pass by you and all you will get is an image that is not sharp…. and isn't streaked enough to convey the sense of motion.This is when you need to use a tool widely known to nature photographers. They use it to keep the whole scene in focus, create smooth flowing milky water, etc.. The tool is the Neutral Density Filter. What is does is basically block some of the light from hitting the sensor without changing any other light parameter, kind of like regular sunglasses. They come if different varieties, ND2, ND4, ND8..ND512. The different ND filters are quantified by their optical density or equivalently their f-Stop reduction. ND2 = 1 stop of light reduction, ND4 = 2 stops, ND8 = 3 and so on. You just thread it to the front of your lens and you are good to go.Now that we have s slow enough shutter speed due to the ND filter, and the athlete actually looks blurry we have to take in consideration camera shake. A tripod is a must for this shot. In order to keep everything surrounding the athlete nice and sharp with such a slow shutter speed, we will need to place the camera on a tripod. Depending on what sport you are shooting, you will have to predict where the athlete is going to be when you are pressing the shutter release.So now we have a steady camera and slow shutter to create motion blur. Since you already have a pretty small aperture, you can utilize the f/16 rule for starring the sun if your angle allows! That's another element that is going to add even more to your image and will give it that warm good feeling.At this point the image looks pretty good except for the dark athlete. In our situation the sun is in front of the athlete and he is in the shade rendering him pretty dark. One flash is all you need to fix that. Add a little fill light behind the athlete to open the shadows and you are all set. There is one thing you have to keep in mind: Flash duration Just make sure you choose an appropriate setting for your flash so that the flash duration is not overly fast, otherwise it will ruin your blur effect. On the other had, it may look great to have a sharp image of the athlete at the end of the blur streak. If you need to have your flash at a high power setting, be sure and place it far enough and may be point it up a little. The flash will also need to be in Rear-Curtain Sync mode to make sure it fires at the END of the exposure, or the image will look unnatural.That's it! We incorporated a few different techniques that work well with each other for the most part to add different elements to our image. Next time you are out shooting think of what else you can do to add to your images. There must be something….have fun!


Comments