It looks like you are using an ad blocker. That's okay. Who doesn't? But without advertising revenue, we can't keep making this site awesome. Click the link below for instructions on disabling adblock.
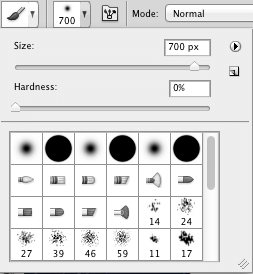
There are more tools available in photoshop than most people could ever know what to do with. Brushes, however, are possibly the most important tool that everyone should learn how to use.Contrary to what you might think, photoshop brushes are not just for painting or drawing cool designs. Brushes can be used for layer masks where you "paint in" specific areas of a layer. They are also the "gateway" tool for almost every other tool. If you know how to use brushes, you'll easily pick up the clone stamp, healing tool, spot healing tool, dodge/burn tools, etc… All of which will become go-to tools for certain situations. (Image sharpened using selective sharpening by painting a layer mask. Slight vignette and athlete brightened by using brushes.)To access the brush tool, simply press (B) or click on the brush icon. You can change colors by using the color picker.One of best qualities of the brush, is that it can be modified for many different situations. Say you create a new layer and want to only blend part of it with the original (like if you have a person and create a brightening layer to brighten them up, but not the background), you can easily mask the layer by using a layer mask, and use the brush to "reveal" or "brighten" the person up by painting with a soft edged brush.For the most part you will be using a round brush. However, if you feel like getting artsy, look around at all the different types of brushes in the drop-down menu. Most of the time we use a soft edged round brush. You'll also want to set your size in the drop-down menu. The larger the brush with less hardness (how defined the edge of the brush is), the softer it will look, and the more it will blend. You can also use a hard edged brush if you don't want the layers to blend as smoothly. Hardness can be set using the hardness slider below the size adjustment slider, or you can choose a solid edged brush by clicking on this one: There is an option up top that lets you choose the blending mode of the brush. This is more advanced and will be discussed in the advanced article later, but is an option that we don't typically touch.Next to that is Opacity. This setting determines how strong and full the stroke is. If you choose a low opacity, say 30%, only 30% of the paint will show up. This lets you work in finer details and paint some areas darker than others. This is also affected by the "pressure-sensitivity" setting if you are using a Wacom pen tablet. With a Wacom tablet, simply click this button: and your pen will become pressures sensitive. If you press down hard, you'll paint at 100% opacity, soften it up and that will be reflected in the opacity.As with all photoshop tools, the best way to get used to them, and understand how they work, is through trial and error. Experiment first with a blank background in photoshop and learn how each setting works. This is the foundation for most selective photoshop adjustments. To apply the brush to an actual edit, try this method for selectively sharpening by using a brush: Sharpening 101.


Comments