It looks like you are using an ad blocker. That's okay. Who doesn't? But without advertising revenue, we can't keep making this site awesome. Click the link below for instructions on disabling adblock.
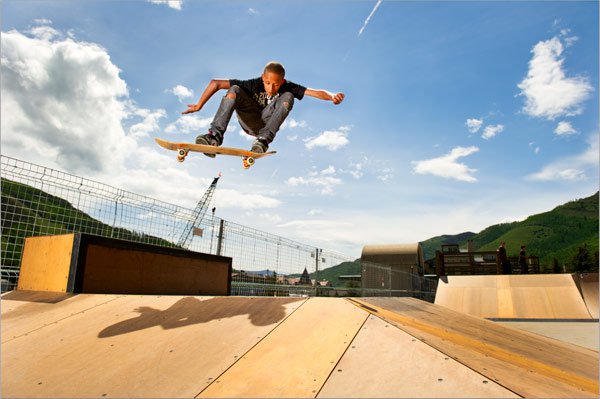
Photoshop is one MONSTER of a program. There are so many tools and techniques that it's easy to overlook some of the simplest but most effective ones like the dodge and burn tools.With these tools, you can draw more attention to the athlete by brightening them up, while darkening the scene around them. It's simpler than most techniques, and provides great results! Before and After dodge/burn techniqueUp until photoshop CS4, these tools were not really worth your time. The issue was that they didn't "protect tones" or keep the color of whatever it was you were trying to brighten or darken. Instead, they would just add more black or white to darken/brighten where you painted. If you have CS4 or above, make sure you check the "protect tones" option once you've selected the tools. It makes these work incredibly well! If you are using CS3 or below, then we recommend not using these tools too much.1. Create a copy of the background layer with CMD+J for macs, and CTRL+J for PCs. This way, you can adjust the layer opacity after to back off the effect, or even delete the layer if you mess up. It's not necessary but very highly recommended. You can find more information on this here.2. Select the Dodge tool. The dodge tool will "dodge" (brighten) the highlights/midtones/shadows. We find it works best to use it on the darker parts of an image in most cases. 3. Select a very soft bruch and set your brush size according to what you want to brighten. Then, set the opacity for the effect to 8-12%. This way you can paint multiple strokes, and the effect won't be too strong right away.4. Make sure the "protect tones" checkbox is selected.5. Paint the area you would like brightened with the tool set to midtones, or shadows. We typically will paint in both on the athlete to brighten them up a bit.6. When you are happy with the look, go to step 7. If you feel you "overdid" the effect, adjust the layer opacity to back it off. 7. Merge the layers by right clicking in the layer's palette and selecting "merge visible". This way you can create a new copy of the background layer by pressing CMD+J or CTRL+J for your "burn" layer.8. Select the Burn tool by right-clicking on the dodge tool and clicking on the icon that looks like this:9. Choose a soft brush, set brush size, set opacity to 8-12%, make sure "protect tones" is still checked, and choose "midtones" or "highlights" depending on what you would like to darken. Midtones seems to work best for most situations, unless you are trying to get rid of glare or a blown-out highlight.10. Darken everywhere you need to, especially areas that you don't want the viewer's eye being drawn towards. Choose a larger brush for this or the strokes will look too obvious.11. Since this is on a background layer copy, you can delete the results and start over if you aren't happy with the look by removing the layer. You can also simply adjust opacity to lower the effect.This technique takes some practice to get the hang of, but once you are used to it can become a powerful editing technique! Don't be discouraged by all the settings initially, it becomes very simple over time.


Comments